A few fun facts about our first SYTYC entry-
our cute mom and dad (and burke!) walking downtown after our photo shoot
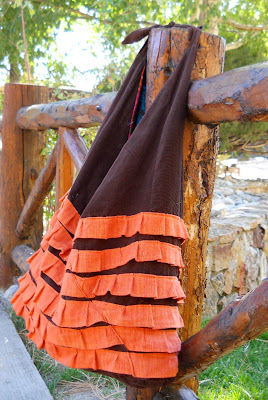
1. Our mom was our model. Isn't she too cute? She totally is not a girly girl, so it was so funny to take her picture with a giant, ruffle-y purse. Oh, and the boots-over-the-jeans was a new look for her- she rocks it, though, does she not? Our dad just kept telling her how great she looked and even convinced her to sport her new look downtown for dinner that night. He's cute, too.2- The purse is a birthday present for our sister-in-law, Tricia, who we adore (that's her with our brother above). Seriously, love the girl. Not only does she love love love fall, but her birthday is at the beginning of October. Perfect. Oh, and as a total side note, it is a little tricky to write in the singular for SYTYC (my sister-in-law instead of our sister-in-law)... But writing we're would give us away, and we want nothing to do with anything shady that would tip y'all off, so singular writing it is, tricky or not.
3- Some of the pictures were taken in Buena Vista, CO (our very favorite place in the world!) at Frontier Ranch. Our dad grew up in BV (our grandpa still lives there) and we've made about a million fabulous raspberry picking, s'more roasting, star gazing, creek wading memories there. Have any of you been to Frontier? Adam was on summer staff there in college, so we still go up for weekend excursions whenever we can.
After all of that, I should say, we just love this project. Would you like to make one of your own?
To make a Pumpkin Patch Weekender, you'll need:
-a yard of corduroy
-a yard of lining fabric
-a yard of orange flannel
-a sewing machine and supplies
1. Fold your corduroy in half width wise (so that the selvage edges align). Cut two 5" tall rectangles from the bottom of your halved fabric (resulting in two 5" x 45" fabric rectangles). Repeat with your lining fabric.
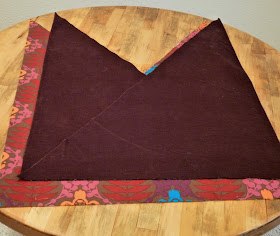
2. With your corduroy still folded in half, cut a diagonal line from one corner to the other, resulting in two large isosceles triangles of fabric. Cut along the folded edges, yielding four corduroy right triangles. Repeat this whole process with your lining fabric.
3. Cut each of your 5" x 45" rectangles down to 5" x 26". These rectangles should now match the height of your right triangles (they'll be your gussets). Sandwich each gusset between two triangles and sew in place. Repeat three more times with your other 5" x 26" rectangles and their corresponding triangles. At the end of this, you should have two corduroy pieces (sort of triangular, see above) and two lining pieces.
4. To make your lining, place two of your lining fabric right triangles on top of each other. Where they overlap, turn the exposed edge under (you can iron this edge under if you please) and stitch in place. Repeat with your other two lining fabric triangles.
5. Cut two 5" x 10" rectangles and a 8" x 45" rectangle from your flannel. Finish off the top edge of each one.
6. Sew the two side edges and the bottom edge of your 8" x 45" rectangle to the bottom of your overlapped lining triangles piece, leaving the top edge open. Then, at equal intervals, sew vertical lines to divide the big pocket into four smaller pockets (to find the equal intervals, I folded my fabric in half then in half again and marked the folds with a fabric pen).
7. Sew the two side edges and the bottom edge of your 5" x 10" rectangles to your 5" x 26" lining fabric gussets, leaving the top edges open.
8. Line up all of your finished lining fabric pieces in order- overlapping triangles then gusset, then overlapping triangles and the other gusset. Pin in place and stitch together into one very long, zig zaggy piece.
9. Stitch your remaining 5" rectangles together into a 5" x 36" rectangle. Pin each 5" end to the bottoms of the gussets, right sides together. Pin the 36" edges to the bottom of each 36" main body lining piece, right sides together. Stitch around the perimeter to attach the lining bottom, leaving a 8" opening on one of the long sides (you'll use this to turn your bag right side in after you stitch the lining to the exterior later). Your lining is now complete and should be able to stand on its own.
10. To make the rows of pleats, cut what remains of your yard of flannel into 3" strips. Depending on how many pleats you add, you'll use all of your fabric for the pleats. Iron down the top and bottom edges and sew down.
11. To make your pleats, slowly sew a straight stitch along the top edge. Every sixth stitch or so, use a butter knife to 'pleat' the fabric under. Keep sewing to stitch in place.
12. Pin your rows of pleats in place on one of your corduroy pieces. Stitch in place.
13. Fold your corduroy triangular pieces into each other (see above #12). Mark the diagonal edges with a fabric pen. Use these edges to pin the rows of pleats on the other corduroy piece. Be sure to match up your rows on the two pieces so that they look like one continuous pleated piece on your finished tote.
14. Sew your triangular-ish corduroy pieces together, right sides together, into your final bag shape. Following the same process as you did with the lining, piece your corduroy bottom together and attach to your bag (see #9). Do not leave an 8" opening.
15. Create the top ties by sewing two 10" rectangular corduroy tubes, about 2" wide. Taper your stitch at the end of one tube to create ties.
16. Place the lining into the exterior bag, right sides together. Sandwich the ties you just made into between the lining and exterior fabric at the top of the gussets, with the ties ending up down inside the purse (you shouldn't be able to see your ties, except maybe the top where you pinned them in place, at this point). Sew around the entire perimeter of the top, two big "V" shapes with little flat breaks at each gusset.
17. Pull the purse through the opening in the bottom of the lining to turn right side in. Stitch the opening closed. Done! Use this beauty as the perfect fall purse or fill it with all of your essentials for a weekend away (or do both!).
We would LOVE to see your own interpretations of this little gem- send us pictures (or add them to our flickr group)!
Oh, and week 2 of SYTYC is up. The theme is costumes. Head on over and vote! :)


I thought this was your craft. I'm not usually very good at guessing. I love it and it got my vote. Congrats on your first win.
ReplyDeletei voted for the weekender, loved it and can't wait to get some material for my own.
ReplyDeleteLove Frontier too! Was there years ago as a High School Young Lifer.
Love it! I'll be making myself one o these for sure!
ReplyDeleteY'all did a fabulous job! Congratulations!
ReplyDeleteBravo and congratulations. What a pretty purse. Your mom is a babe! :)
ReplyDeletecongratulations on your win!!! great project & thanks for the tutorial!
ReplyDeleteThis is gorgeous! Thanks so much for sharing the tutorial. I love it! Congrats on taking week 1!
ReplyDeleteThat was so fun to learn about it and the photo shoot. YOu ladies are seriously so cute. And your Mom totally did rock that photo shoot. Love the bag. And totally did guess it was yours. Cannot wait to see what is up next.
ReplyDeleteI LOVED this and it was the one I voted for. This is on my to do list for sure now. I love what you guys do. Can't wait to see which one was yours this week.
ReplyDeleteJust Another Day in Paradise
I've been following your blog for a while. I sew and also have an Etsy site. I honestly can't even remember how I ended up following you all, but when I was looking at your pics of this and saw the Frontier Ranch sign I got super excited. My husband is on staff at the Young Life camp in Georgia (I worked there before having kiddos). So fun that I've been following you all for some time and had no idea that you had a YL connection.
ReplyDelete