Also, with the Gifts for Guys craziness here, we haven't even mentioned our sytyc projects for 'hardware store' or 'winter.' Did y'all guess that we were the Hibernation Station (above) and the Interactive World Map (below)?
Lucky you, today we have the Interactive World Map Tutorial (still working on the Hibernation Station one... it's coming soon!)-
Our family loves maps. Everywhere we go, we collect a map. We use globes in all our decor and our girls would rather look at maps than have a bedtime story (seriously).
For awhile now, there has been a huge blank space above our sofa in the living room. I wanted to fill it with a piece of art; something unique and creative. My husband wanted a wall map; think of the political one that was surely in your elementary class. I didn't love that idea and every art piece I found didn't seem to represent both of us, so it remained empty for years while we tried to think of something we would both love. I was so excited when we finally agreed on the idea of an abstract world map but as I began looking for such a piece I realized I would have to make one. This fits us perfectly. I love the colors and the way that having 12 different canvases makes it more artistic. My husband is so happy to have a map and he (and the girls) love the pins that show special places we have been, want to go, or know people. We just love it!
To make one for yourself you will need:
- 6 X 9 canvas drop cloth
- 4 jars of sample paint (in 4 coordinating colors)
- 3 2ft. x 2 ft. ceiling panels
- upholstery tacks in three colors
- spray adhesive
- staples
-12 picture hanging fasteners
Before you start:
1- Find a map you want to use as your peice of art. Perhaps you want just the U.S.A., a more detailed map of your state, or a country you have visited or lived in? Ding Maps is a great tool for some very simple maps. I, obviously, chose the whole world.
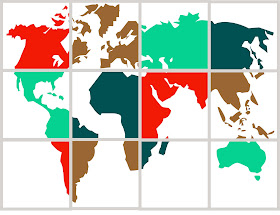
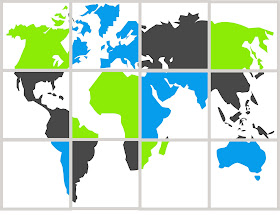
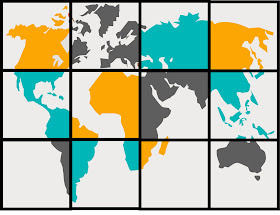
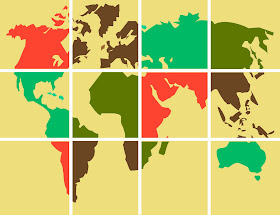
2- For the world map, I used photoshop and put a grid over the world map and tried different color combinations:


Now that you have an idea of what each square canvas of your map will look like, print out your map, buy your colors and get to work! (if you want, you can print any of these images as well)
To make the map:
1- Cut Drop cloth into twelve 18 inch x 18 inch pieces
2- Iron all 12 pieces.
3- With a pencil, draw a 12 inch x 12 inch box at the center of each canvas. (I made a 3 inch wide piece of paper to measure with and then traced around 12 inch tile, you could also use a 12 inch piece of scrapbook paper)
4- Lightly trace a grid onto each box. I made a 3 inch piece of paper to mark my grid. I also made grid lines on my map to give myself a better reference. If you were really smart, you would just print onto grid paper.
5. With a pencil, start drawing your map onto the canvas one square at a time. If you don't trust your own free-hand drawing skills, you could also use a projector to project the image, or take the map to a copy store and have each square printed individually (on 12 inch paper) to create a stencil for yourself. If you are free-handing, draw lightly and don't try to erase mistakes with an eraser. if you do mess up, just ignore it and draw over it. After the project is painted, you will wash all the pencil marks away. Using an eraser will just set the pencil further into the canvas and make it impossible to remove.
6. Once you have drawn all the squares, paint each square. Use your map as a reference for which color to paint each square. The paint-sample cans come with a paint brush, but you will need a finer one for the edges.
7. Let the paint dry completely. With my lighter colors, I needed a second coat, so I painted them again.
8. Once everything is completely dry, spray the pencil lines with a stain remover (I used Spray and Wash) and wash canvases in washing machine on delicate cycle with cold water and a tiny bit of detergent. This will remove all pencil lines. Air dry.
9. Once dry, iron each canvas square individually on a low setting with a non-terry cloth towel over the paint (unless you want paint on your iron).
10. Using a box cutter, cut ceiling panels into 12 inch x 12 inch squares.
11. One canvas at a time, spray the back of the canvas with adhesive spray and put a ceiling panel square on top. make sure to match up the edges of your map with the panel. Smooth out any wrinkles and fold the canvas around the square ceiling panel. Staple into place.
12. Place a picture mounting bracket (we used saw-tooth hangers) on the back of each panel and hang on the wall 1 inch apart.
13. Use upholstery tacks (you can use colored tacks as well, I just like the vintage feel of the upholstery ones) to mark special places on the map. You can customize your key to whatever you want! Our says:
Place To Go, Places We've Been, People We Know.
You are finished! Enjoy your map and piece of art for many years to come!


That's a pretty neat idea.
ReplyDeleteI'm going to suggest that they provide me with a hibernation station at work.
That is fabulous!
ReplyDeleteThis is such a cool idea! I've been coveting almost this exact thing on Etsy for awhile now but its about $300. Yikes! This is such a great, cheap alternative!!
ReplyDeleteLOVE the hibernation station and SUPER LOVE the map! Awesomeness!
ReplyDeleteSuch an amazing idea! How fun and I love that it is personalized for your family! Perfect. Thanks for sharing!
ReplyDeleteI LOVED this project. It is fabulous!
ReplyDeleteLOVED, LOVED, LOVED this. I voted for it of course. I can't wait to attempt this once our basement is kiddo friendly. Good luck on the finale!
ReplyDeleteWhat a COOL project!! Love it!
ReplyDeleteYou guys rock. :)
this is an awesome project you guys, really cool! my girls would love one, now just to find a bare wall in the house to make one... hmmm, I'll have to get thinking. :)
ReplyDeleteThat is amazing! I love it!
ReplyDeleteI totally love the world map, I voted for it and I am glad to get the directions to make one too. We are also a family fan of maps
ReplyDeletewow - this is fantastic! I need one.
ReplyDeleteJust a quick note to let you know that a link to this post will be placed on CraftCrave today [07 Dec 01:00am GMT]. Thanks, Maria
ReplyDeleteWhat an amazing project, you are so creative. I am looking at re-doing my boys' rooms and was going to get a huge world map wall mural but I am not entirely confident about putting that up myself. This is so unique and I cannot wait to get started. Thank you!
ReplyDeleteI love the idea and the final result!!!! I would totally love it in my living room!!!
ReplyDeleteLOVE IT!! I too LOVE maps!
ReplyDeletecome see my world map tutorial
http://girlinair.blogspot.com/2010/12/i-painted-world.html
Happy New Year!
I LOVE this idea! I'm going to make one for the guest room...it would be great to see where we have been and then see what needs to be added to our 'bucket list'...thanks for the inspiration!!!!
ReplyDeleteShantel @ www.itsapricelesslife.blogspot.com
I loved this idea so much, it inspired me to do one of my own and I had been wanting to make my own "map" for a while!! I linked back to your tutorial on mine. I'm very curious to read about your hibernation station. How did you make the flowers hanging above it? Those are really pretty! Looking forward to reading more from you ;)
ReplyDeleteCheryl
http://pinkladyslipper.blogspot.com/2011/01/my-diy-world-map.html
eastcoasterl06@gmail.com
this is awesome! would you mind if i posted a photo and linked it back to you on a post tomorrow? i love it! :)
ReplyDeletei'm moving soon so i want to do this for my new place!
www.paisleyprintshoes.com