Oh my. I think the geniuses at
RIT Dye are my new BFFs.
They've come up with a
Color Formula Guide that lets you make more than 500 colors by combining their dyes (and sometimes water). I have this thing for custom colors and have always felt a little, well, stifled by the set group of colors out there. But NOW, now I have a secret weapon for all my custom color needs. Feels fabulous.
I almost couldn't decide which project to work on with the beautiful box
RIT sent me (including every. single. dye. color. in their line)! But then I couldn't get the idea of dying wood without the yucky, smellyness of wood stain our of my head. Plus, we don't have a way to display our Christmas cards. And we need one. So there's that.
Do you need a spot to put all of your Christmas cards too? To make a dyed Christmas Card Tree, gather-
-scrap 1"x2" board, cut into eight pieces (6" long, 9" long, 12" long, 15" long, 18" long, 21" long, 24" long, and another 24" long for the trunk)
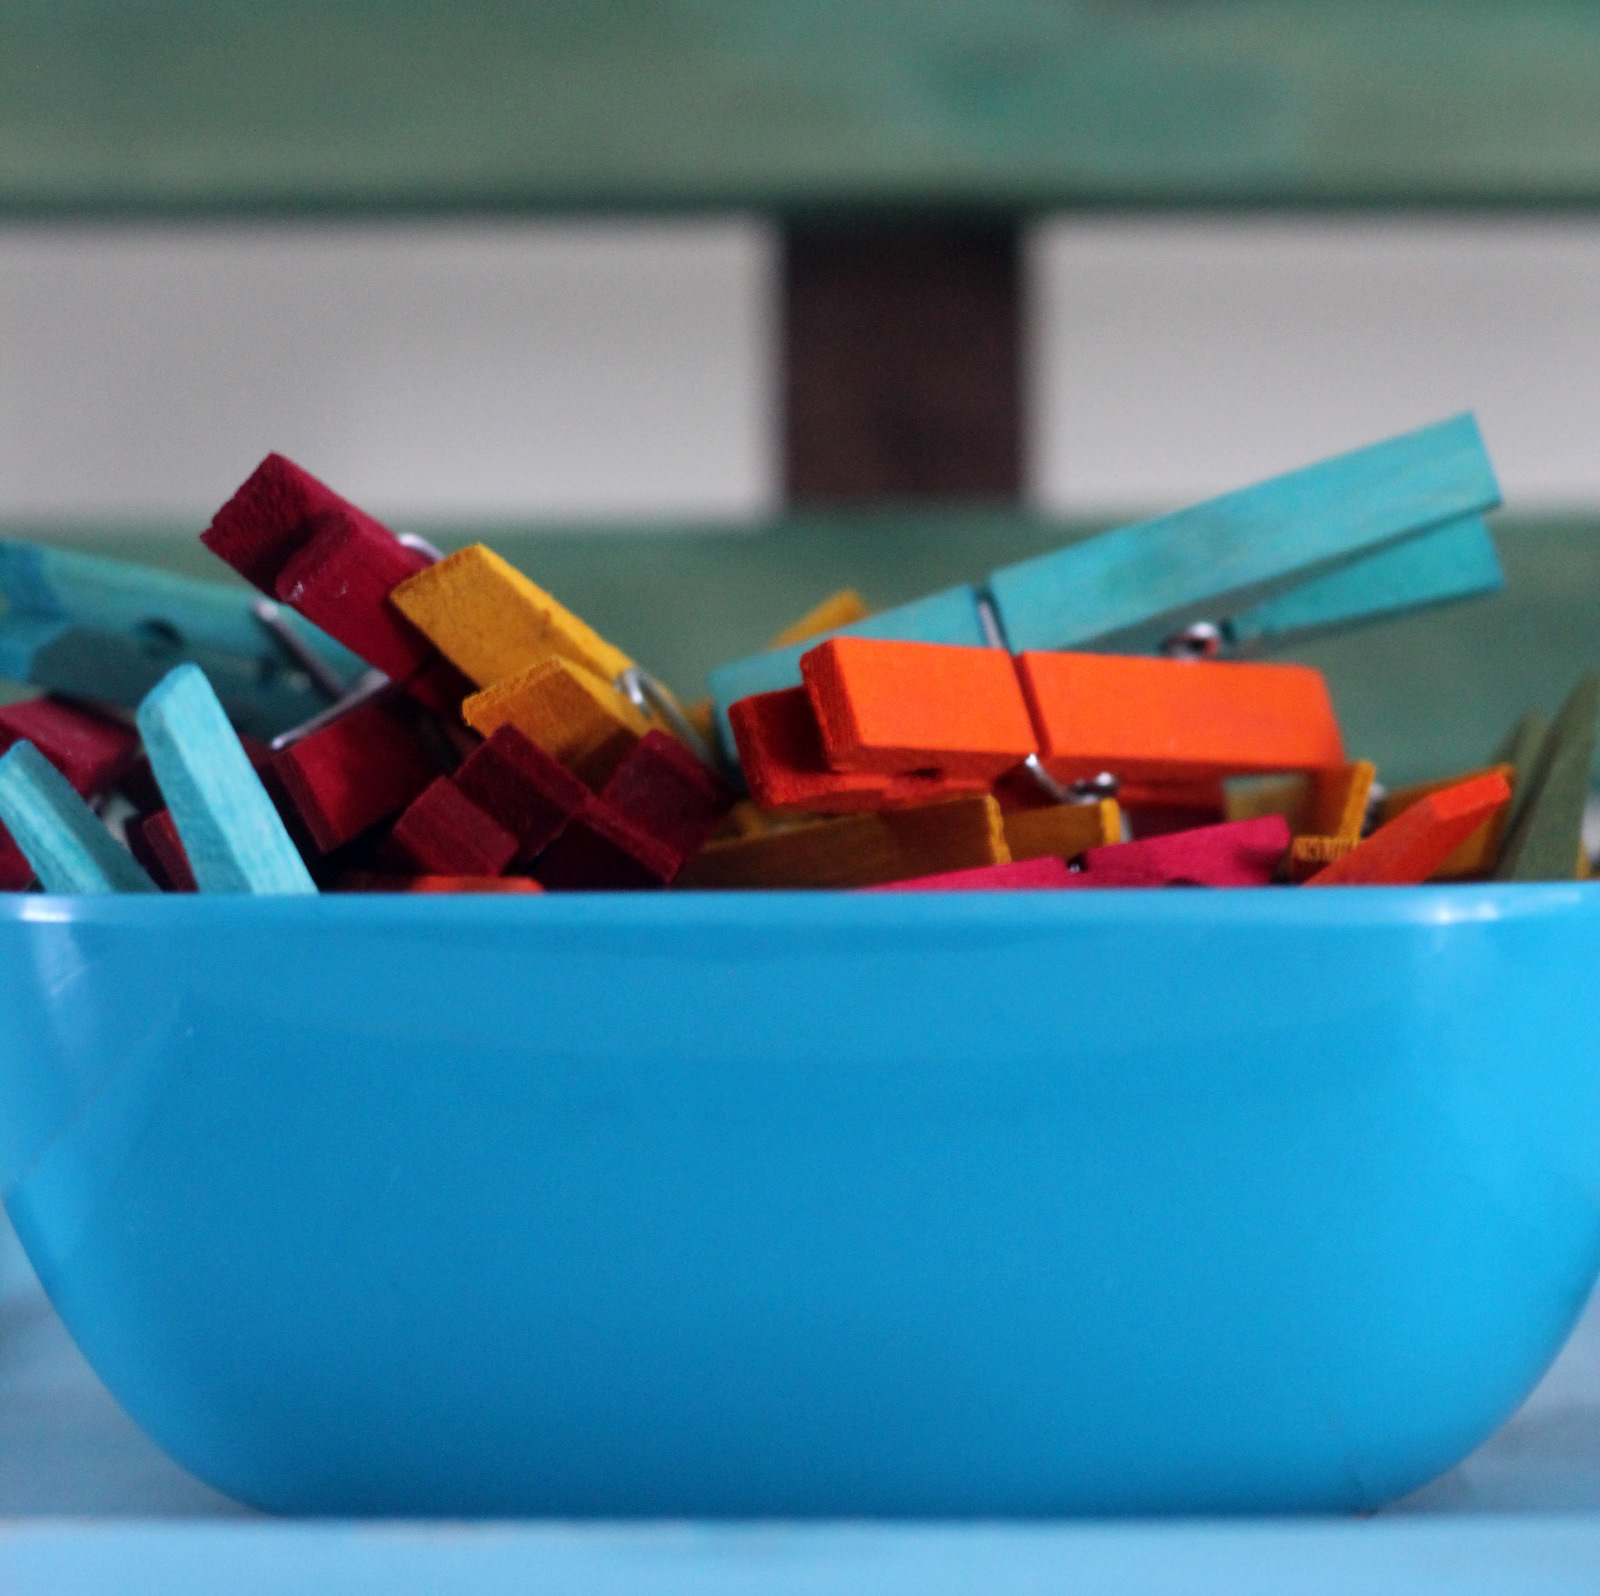
-wooden clothespins (I used twenty two)
-RIT dye
First dye your clothespins. Make small batches of dye and soak your clothespins in the dye to make yourself a mini clothespin rainbow (I'll be honest, I. love. these!
No clothespin is safe from the RIT dye now that I discovered how fabulous they look dyed).
Nail the shorter boards to the longest board, in order from shortest (on the top) to longest (on the bottom).
Paint green dye on the 'branches' and brown dye on the 'trunk.'
Let everything dry out (the clothespins and the 'tree'). Hot glue the dyed clothes pins onto the 'tree' like lights. Arrange the top row in a yellow starburst pattern. Glue that in place too.
You're done! Add Christmas cards and you have a seriously fabulous display.
ps- More places to keep up with RIT dye-
Also, Beckie from Infarrantly Creative will be hosting a giveaway for RIT's entire line on December 9th! 


How clever and cool! thanks for the tutorial!
ReplyDeleteYour tree is fabulous, Kristin! I can't wait to stain something!!! The colors are wonderful!
ReplyDeleteSmiles!
Jami
www.blackberryvine.blogspot.com
i keep telling myself to pick up RIT everytime i see it .. but this has given me that extra push! and i totally need somewhere to put cards -- thanks for sharing!
ReplyDeletehttp://binksandbubble.blogspot.com
I love that you dyed your clothespins! Soooo incredibly cute. Now, we really need to meet IRL so our brain twins can meet. LOL!
ReplyDeleteDid you know that RIT Dye had a color guide around in the 50's (or sometime around there)? My grandma had it and I LOVED making custom colors using it. Yeah RIT dye and I go way back... before you were born type back. I LOVE it!! Its what I use to dye the reeds when I weave baskets... make that wove baskets.
ReplyDeleteAnd I have to say thank you!! I am so stoked about being the rustic satchel winner!! :)
How fun is this?! I love that you dyed the clothes pins in all those bright colors!
ReplyDeleteThis is fabulous!!! I so want to make this!! If I get to finish it before this weekend, I'm going to link back to you on my blog! :)
ReplyDeleteWHAT!? I have been spray painting my clothespins argh.... I love this idea since I use clothespins for displaying food titles at parties....EXCITING!!
ReplyDeleteThanks:)
Ruthie
This is so pretty Kirstin! Who knew Rit dye could dye wood? Not me!
ReplyDeleteThat is just adorable!!! I adore it.
ReplyDeleteI featured it on my TT&J FB page :)
xoxoxo
Jen
Does the dye wear off the clothespins? I teach pe and use clothespins to divide teams and for games. I'm just worried the dye will come off on kids' clothes.
ReplyDeleteDoes the dye come off the clothespins? I'm a pe teacher and use clothespins to divide kids into teams and use them in games. Do you think the dye will come off and stain the kids' clothes?
ReplyDelete@Lisa
ReplyDeleteHey Lisa! I haven't tried them on clothes, and I did let them dry for a few days before gluing them to the tree, but I don't think the dye comes off.
I just unclipped all of my Christmas cards to see if any of them have dye on them and didn't see any traces of dye.
The key is probably letting them dry entirely.
Let me know if you try it out!
Such a good idea! I always wondered if you could use the dye for other things. This is awesome!
ReplyDeleteLove this card tree!
ReplyDeleteLOVE this, and my 4 year old and I are about to make our own version. I do have a question though, you show 9 lengths of wood in the cut list, but I only see 8 being used? 1 for the 'trunk' and 7 as the branches. Please confirm!! Thanks!
ReplyDelete@Leah
ReplyDeleteHey Leah! So fun that you're making one too!
Just measured... yep, you only need 8 pieces of wood. The 'trunk' is 24" and the branches are 6, 9, 12, 15, 18, 21, and 24". I'll update the tutorial! :)
Send over a picture when you're done!
love
k
Kirstin - thanks for confirming I wasn't losing the ability to count or read ;) We ended up just forging ahead, but with a 27" trunk piece. I had green Rit dye, so we used that for the branches, but I didn't feel like going out in the cold so I used gel food colouring for the rest of it. I eventually hand painted the pins because they didn't soak deep enough for my taste. It looks really good though, I can only imagine how much easier and brighter it would have been if I'd used all Rit! Here's ours - https://picasaweb.google.com/117814727940399094142/Public#5685640697799852162
ReplyDeleteThanks again for the great tut and blog!!