As you find/make some inspiration, are you needing a spot to pin your clippings, swatches, print outs, and to do lists? Me too! My current pile-on-a-table method is less than inspirational for sure.
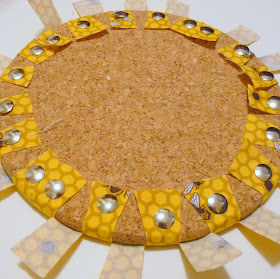
Luckily, my lovely friend Erin got me some Innocent Crush for my 30th birthday that was crying out to be showcased. Pair that (and a couple other fabulous yellow prints) with some round cork trivets I picked up at Ikea in November and now I have a trio of fabulous fabric covered cork inspiration boards to replace my lackluster table stack.
To make a round fabric covered inspiration board, you'll need:-round cork board (like I said, the ones I used are actually cork trivets that I got at Ikea... they came in a three-pack)
-swatches of fabric a bit bigger than the diameter of your cork board
-fabric pen
-push pins
-scissors
1. Iron your fabric. With a fabric pen, trace your cork board on the wrongside of the fabric.
2. Cut your fabric into a circle a bit bigger than the circle your traced (I'd say I left about an inch around the perimeter).
3. Cut little slits all the way around your circle almost up to, but not quite meeting, the circle you traced.
4. Center your cork board on your fabric inside the circle you traced. Start by pinning little tabs at the top, bottom and both sides (to hold the fabric in place).
5. Next, go around the perimeter pinning every other tab around the back of the cork circle. Pin as close to the edge as you can.
6. After every other tab is pinned, go around the perimeter again and secure the remaining tabs. Pull them taut and pin further onto the cork. This will ensure that the pins don't overlap.
7. Done! Use your cork board as a picture frame, to do list holder, inspiration board, the list goes on.
Here they are in their 'natural environment'... aka, my craft room.


Those are so great I love the fabric you've picked!
ReplyDeleteWOW Iam headed to Ben Franklin today to get all this stuff!! LOVE LOVE LOVE this!! Thanks for sharing! THIS is what inspires me!!
ReplyDeleteThese are fantastic! I am so excited to make them & decorate my office area in my apt!
ReplyDeleteawesome! That is such a great idea!
ReplyDeleteHello!!
ReplyDeleteI just gave you the Stylish Blog Award!
Check it out!
http://idreamcrafts.blogspot.com/2011/01/stylish-blogger-award.html
Once again a fabulous idea! I predict these will go BIG!
ReplyDeleteThese are adorable. I never would have thought of covering up those cork board circles. You guys are geniuses!
ReplyDeleteThose are so much fun- the circles are a fantastic idea! Thanks so much, I'll be linking.
ReplyDeletelove them!! they are so gorgeous!
ReplyDeleteThese are fantastic. I can imagine a wall of these in different sizes. Thanks for the inspiration
ReplyDeleteI love the cork boards! such cute fabric. I love getting inspiration from your blog.
ReplyDeletethe yellow is lovely! i used fusible webbing for my round cork board tute on craftzine.com...keeps you from poking yer fingers with tacks!
ReplyDeletehappy new year!
What a great idea! I love the shape and the fabrics. Plus, this takes away some of the clutter rather than adding to it. Thank you!
ReplyDeletehey! i LOVED the way you used your circles...i was wondering if you could maybe post a tutorial for the panel? also, i am basically re-doing my room of of your stuff! I LOVE this blog! do you guys have a newsletter? thanks!
ReplyDelete-gracie beal
(gracie_beal@yahoo.com)
LOVE how you put these on an inspiration door! So beautiful and terribly practical. This is going in my list of to-do-eventually's.
ReplyDelete